
Friday, 30 October 2015

Thursday, 29 October 2015
Kuk Sool Won - Last Training Session
It was a sad day when my last training session arrived. After about 15 years of continuous training, taking at least a year off from training at Halesworth was the hardest part for me. Saying that, I am planning on visiting a club in Argentina and continue to practice myself...


Wednesday, 28 October 2015
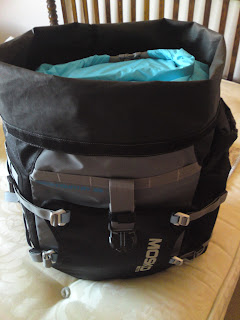
Packing my Pannier
This is for the women out there - my packed pannier (Dee's) - for a year! It is a good job I am a light traveler as my pannier does not fit a whole lot inside! The pic below is what I needed to fit in....

This useful but chunky guidebook needs to be packed somewhere too...not sure where. Oh - and meet Mr Robin! He is our lucky mascot for the trip - we have had a very friendly robin in our garden for years who would follow me around - so thought he should come too! He is not very big so will slip in the luggage somewhere....

I invested in some very lightweight packing cubes (Eagle Creek) to make it easier to pack as well as easier to find stuff. So in the largest cube I have trousers, wrap around skirt, dress, fleece, shirt, 2 x vests, tshirt. In the middle size cube I have what I call "sport items" - bikini, capri running tights, merino wool top and bottom, waterproof socks. The smallest cube contains my underwear and other socks. The pic below shows most stuff packed into the cubes....

Also in the pannier, I have a travel towel, mini radio, inflatable pillow, journal book, feather gilet, toiletry bag, silk sleeping bag liner, my amazing camp chair, flipflips, sandals and running shoes.
Packed.......!

This useful but chunky guidebook needs to be packed somewhere too...not sure where. Oh - and meet Mr Robin! He is our lucky mascot for the trip - we have had a very friendly robin in our garden for years who would follow me around - so thought he should come too! He is not very big so will slip in the luggage somewhere....


Also in the pannier, I have a travel towel, mini radio, inflatable pillow, journal book, feather gilet, toiletry bag, silk sleeping bag liner, my amazing camp chair, flipflips, sandals and running shoes.
Packed.......!

Sunday, 11 October 2015
Other Modifications
Rear Shock Refurb
The rear Showa shock needed servicing and set up so I asked a local company MCT Suspension in Stowmarket if they could help. I also asked if they could fit a remote adjuster so I could adjust the setting for two up and two up fully loaded with luggage, without a spanner.
We worked out all our weights and from this they fitted a new spring and serviced the shock. We did this with our Ducati ST4S and the difference was huge. They also fitted a remote adjuster from a Pan European and left a long enough hose so I could make a bracket to locate it. I chose just below the left side panel - see below.

Pannier Frame Extension
The right hand side pannier frame is extended away from the bike side panel to allow for the exhaust. However, the pannier frame on the left hand side was made close to that side panel to allow for a wider hard pannier to be fitted. We bought a pair of Mosko soft panniers that fit to the pannier frames like hard panniers. With the pannier bracket fixed to the left hand frame it was impossible to access the seat lock in the side panel. The pannier clasp also clashed with the plastic rack frame and could not be closed.
The answer was to extend the frame out on this side to match the right. This was done by cutting each tube and inserting a new piece of tube with a solid bar spanning each joint when it was welded. This allowed access to the seat lock, allowed the pannier clasp to close and gave space for 2 x tool tubes.

Left Foot Peg Extension
After the pannier frame was extended on the left it showed up a problem with the rear foot peg that was originally closer to the bike frame than on the right. It meant that Dee's foot clashed with the pannier frame. A simple solution was to make an extension piece to bring the foot peg further way from the frame.

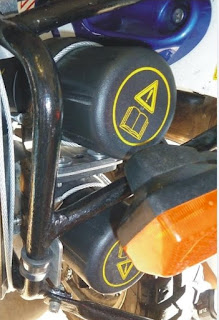
Tool Tubes
A pair of tool tubes were fitted in the gap between the left pannier frame and the side panel, one above the other - like a shotgun!
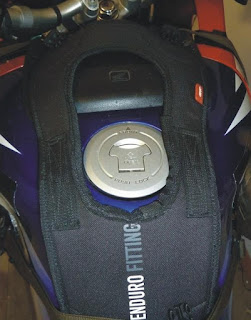
GIVI EA110 Enduro Tank Bag
The tank bag base is permanently fitted to the bikes tank. However, the opening to access the fuel cap needed to be modified.
Speedometer
The main speed numbers are in mph so a simple way to read km was to paint white marks at 30, 50, 70 and 100 km/h.

The rear Showa shock needed servicing and set up so I asked a local company MCT Suspension in Stowmarket if they could help. I also asked if they could fit a remote adjuster so I could adjust the setting for two up and two up fully loaded with luggage, without a spanner.
We worked out all our weights and from this they fitted a new spring and serviced the shock. We did this with our Ducati ST4S and the difference was huge. They also fitted a remote adjuster from a Pan European and left a long enough hose so I could make a bracket to locate it. I chose just below the left side panel - see below.

Pannier Frame Extension
The right hand side pannier frame is extended away from the bike side panel to allow for the exhaust. However, the pannier frame on the left hand side was made close to that side panel to allow for a wider hard pannier to be fitted. We bought a pair of Mosko soft panniers that fit to the pannier frames like hard panniers. With the pannier bracket fixed to the left hand frame it was impossible to access the seat lock in the side panel. The pannier clasp also clashed with the plastic rack frame and could not be closed.
The answer was to extend the frame out on this side to match the right. This was done by cutting each tube and inserting a new piece of tube with a solid bar spanning each joint when it was welded. This allowed access to the seat lock, allowed the pannier clasp to close and gave space for 2 x tool tubes.

Left Foot Peg Extension
After the pannier frame was extended on the left it showed up a problem with the rear foot peg that was originally closer to the bike frame than on the right. It meant that Dee's foot clashed with the pannier frame. A simple solution was to make an extension piece to bring the foot peg further way from the frame.

Tool Tubes
A pair of tool tubes were fitted in the gap between the left pannier frame and the side panel, one above the other - like a shotgun!

GIVI EA110 Enduro Tank Bag
The tank bag base is permanently fitted to the bikes tank. However, the opening to access the fuel cap needed to be modified.

Speedometer
The main speed numbers are in mph so a simple way to read km was to paint white marks at 30, 50, 70 and 100 km/h.
Thursday, 30 July 2015
Africa Twin Seat Modification
We decided to do our trip on a 2001 Honda Africa Twin, which came with a
Touratech after market seat. After a
trip to Brighton Speed Trials it was obvious that the seat was too short but more
importantly very uncomfortable. Dee had a ‘numb bum’ by the time we got to
Woodbridge! So I thought I would write
a bit about what we did to overcome it.

We were given the name of a local upholsterer near Bury St Edmunds who also covered bike seats so I took the seat to him. One issue was that the pillion section sloped so I asked if extra foam could be added in a wedge shape to make the rear part stepped and flatter so hopefully more comfortable. Unfortunately although more foam was added, it wasn’t wedged so the step was still sloped and was no better. The seat cover was originally riveted to the fibre glass base but was returned with the cover glued in place so modification was now more difficult!

We did some research on seat manufacturers and found a company called P&P Seating Ltd in Birmingham. After a few e-mails with photos and sketches we decided that they could re-mould the seat. Rather than use upholstery foam, they produce their own moulds and sculpture them to fit different seat bases.

Unfortunately, after moving the clasp on the underneath of the seat to centralise it better on the bike, the threaded inserts that were fitted into the seat when it was made came loose! I couldn’t repair them properly so had to remove them leaving two holes. I then made a cardboard template for new plates that fitted either side (inside and outside) that would clamp together. This is hard to describe but the finished job was a much stronger seat clasp.

We took the extended seat to P&P and discussed what we wanted with them. We also saw many seats that they had made and saw one design that we particularly liked that could be fitted to our seat. We were also able to choose the material, which could be embossed if we wanted. P&P then sent some e-mails showing photos of the rough mould fitted to our seat.

We tweaked the length of the rider and pillion seating areas until we were satisfied. P&P then carried on to finish the moulding and then cover it for us.

The modified seat now had to be re-fitted to the bike. Because I modified the seat clasp it fitted slightly higher than before so I needed to check the rubber buffers underneath supported the seat on the frame when fitted. I also had to add some buffers at the back to make sure the extension was supported. Once this was done it fitted very well.

Now for the real test, after all this would it be any better? Dee has more room and her area was stepped so she was sitting on a flat seat rather than a sloping one. We only had to sit on the bike to feel the difference. We went for a spin and it felt very comfortable with more space on the back. It will take a longer trip to see how far we can go between stops. Next up is the suspension and a trial run fully loaded.

We were given the name of a local upholsterer near Bury St Edmunds who also covered bike seats so I took the seat to him. One issue was that the pillion section sloped so I asked if extra foam could be added in a wedge shape to make the rear part stepped and flatter so hopefully more comfortable. Unfortunately although more foam was added, it wasn’t wedged so the step was still sloped and was no better. The seat cover was originally riveted to the fibre glass base but was returned with the cover glued in place so modification was now more difficult!

We did some research on seat manufacturers and found a company called P&P Seating Ltd in Birmingham. After a few e-mails with photos and sketches we decided that they could re-mould the seat. Rather than use upholstery foam, they produce their own moulds and sculpture them to fit different seat bases.
So, I decided to remove the
cover (very hard to get the cover off in good enough condition to sell
separately but I managed it) and extend it.
I made up a template from cardboard and cut it to a shape that could be
riveted to the underside of the seat base and fit when fitted to the bike. The extended part will rest on part of the
rack support. I then made the real part
from stainless steel and after lots of bending/bashing made it fit. This was then riveted in place with mastic
in between to take up any gaps.

Unfortunately, after moving the clasp on the underneath of the seat to centralise it better on the bike, the threaded inserts that were fitted into the seat when it was made came loose! I couldn’t repair them properly so had to remove them leaving two holes. I then made a cardboard template for new plates that fitted either side (inside and outside) that would clamp together. This is hard to describe but the finished job was a much stronger seat clasp.

We took the extended seat to P&P and discussed what we wanted with them. We also saw many seats that they had made and saw one design that we particularly liked that could be fitted to our seat. We were also able to choose the material, which could be embossed if we wanted. P&P then sent some e-mails showing photos of the rough mould fitted to our seat.

We tweaked the length of the rider and pillion seating areas until we were satisfied. P&P then carried on to finish the moulding and then cover it for us.
The seat was returned and a
very good job they made of it. The
whole modification from P&P cost approx. £180.00. We could have added gel pads at an extra cost but decided against
this.

The modified seat now had to be re-fitted to the bike. Because I modified the seat clasp it fitted slightly higher than before so I needed to check the rubber buffers underneath supported the seat on the frame when fitted. I also had to add some buffers at the back to make sure the extension was supported. Once this was done it fitted very well.

Now for the real test, after all this would it be any better? Dee has more room and her area was stepped so she was sitting on a flat seat rather than a sloping one. We only had to sit on the bike to feel the difference. We went for a spin and it felt very comfortable with more space on the back. It will take a longer trip to see how far we can go between stops. Next up is the suspension and a trial run fully loaded.
Subscribe to:
Posts (Atom)